Hi,
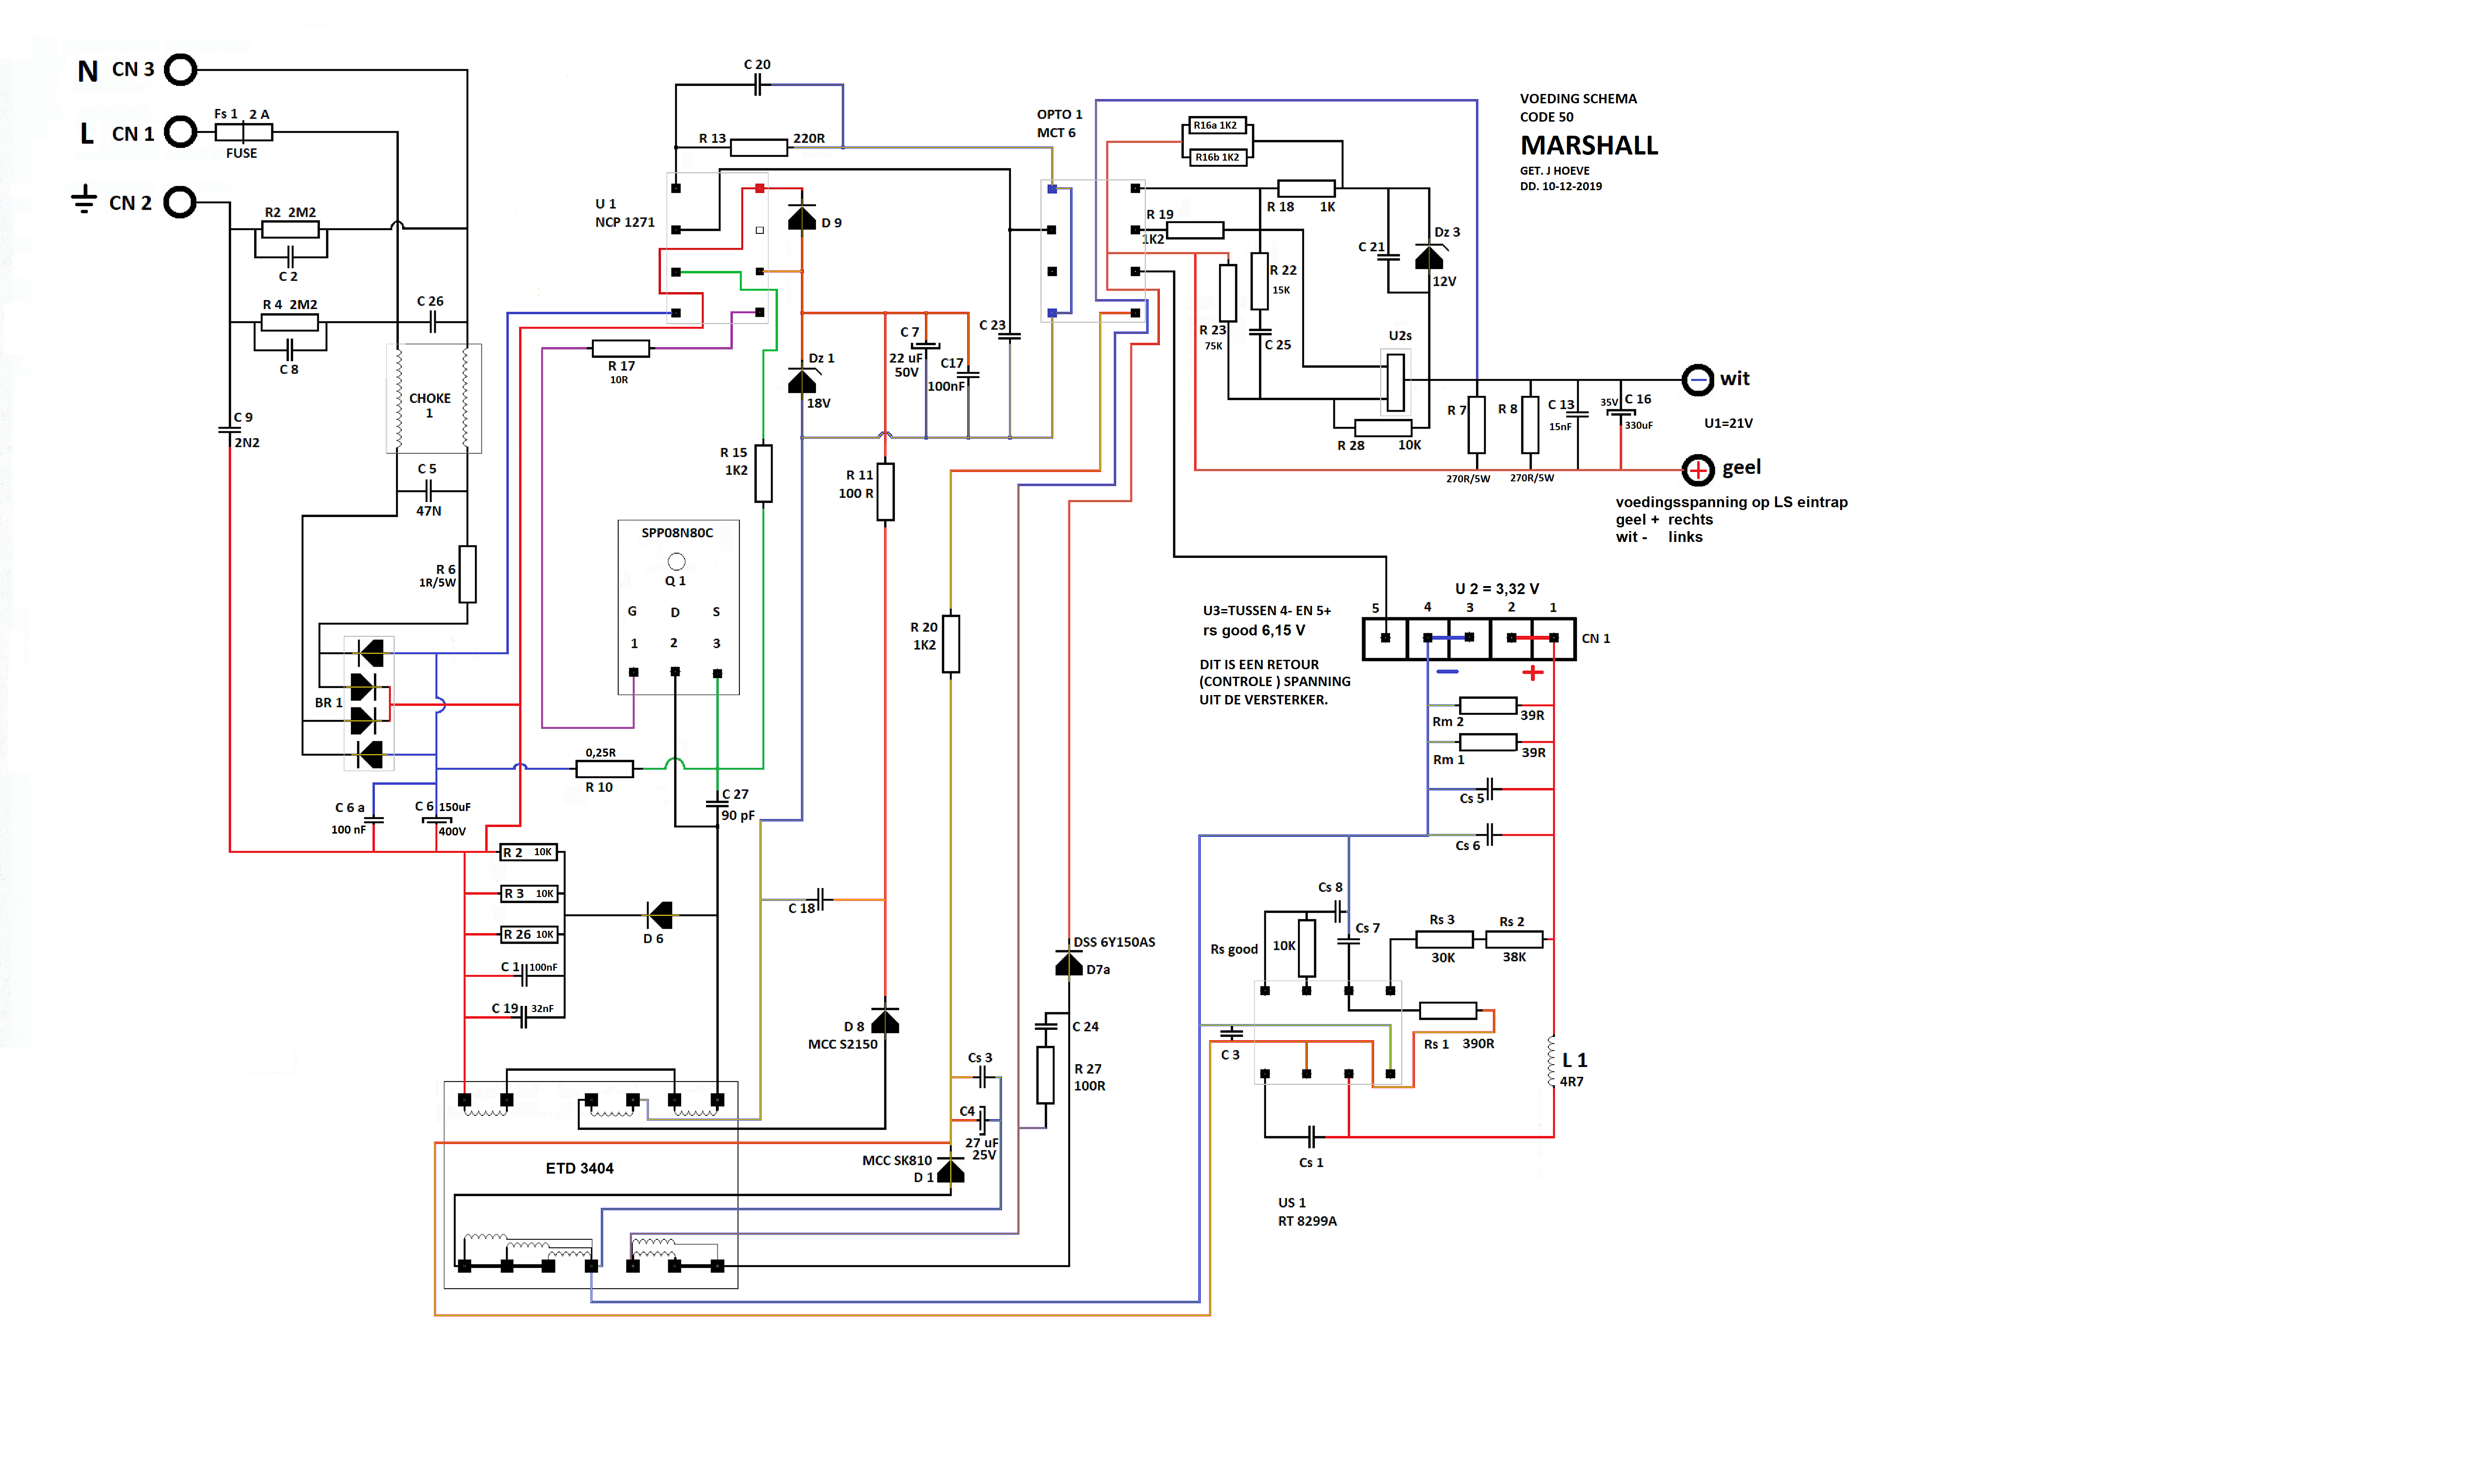
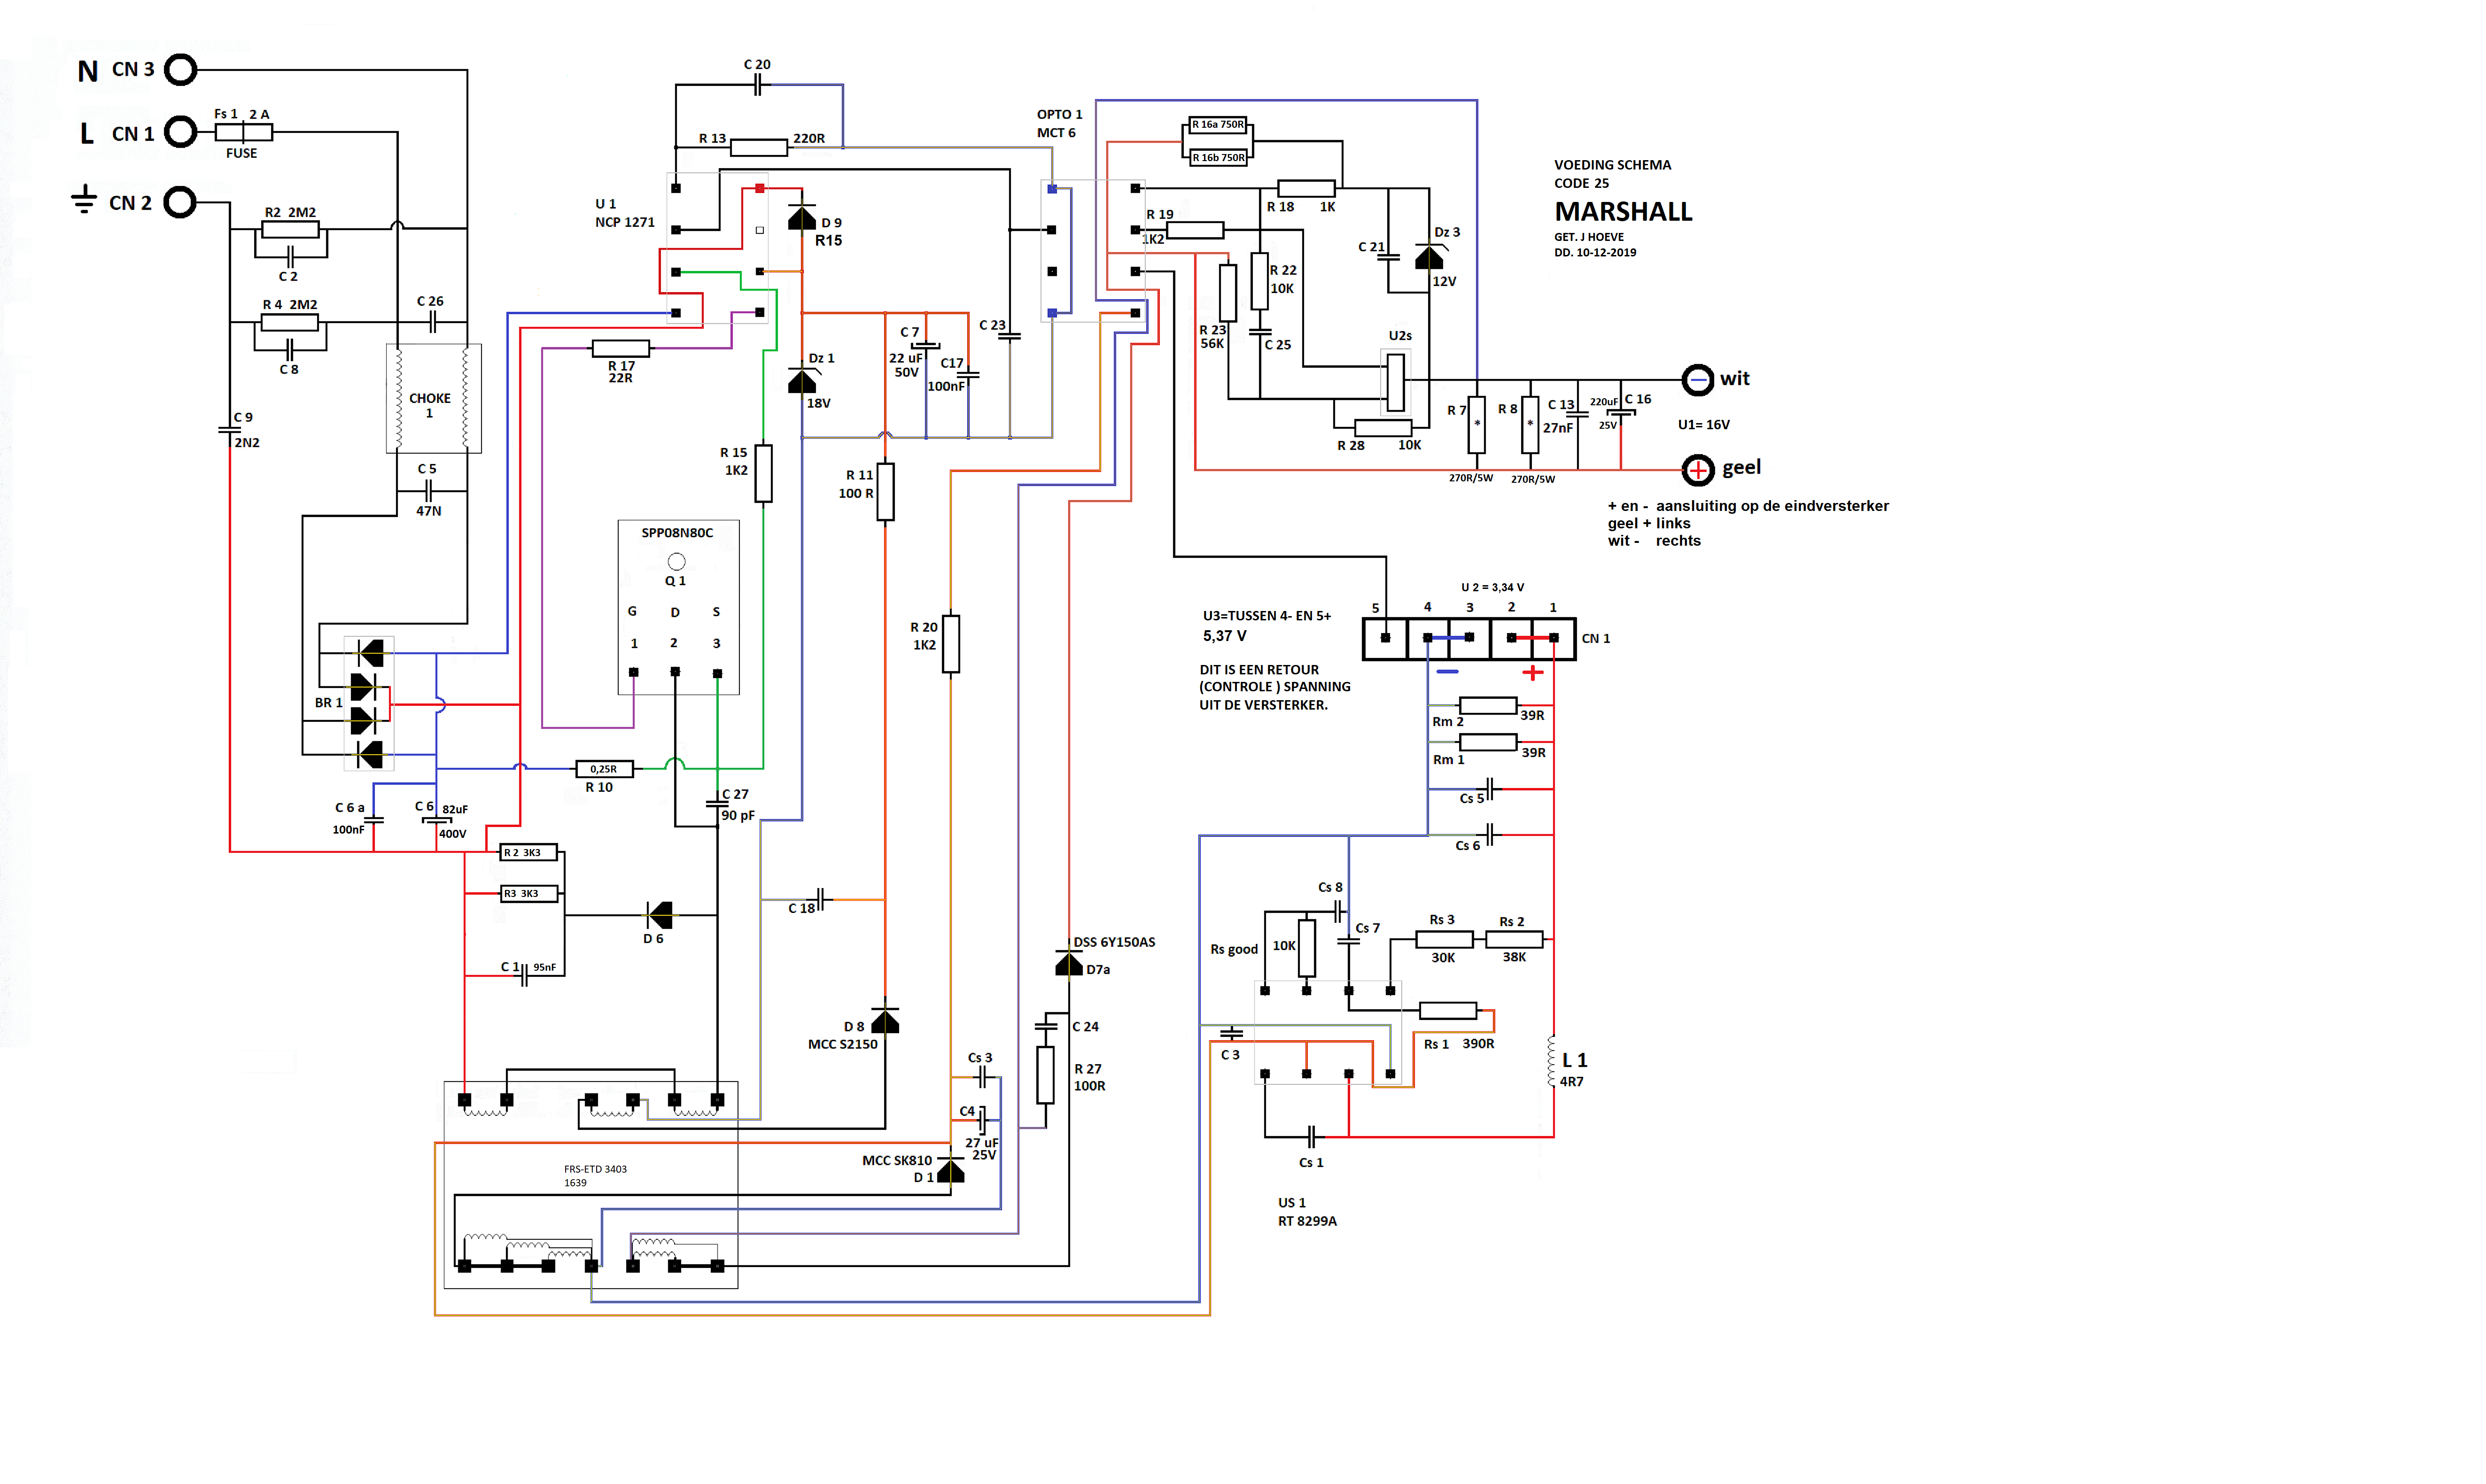
I know that this is a recurrent demand, but please, no more "control the volume using Gateway app" answers, everybody knows that this is a component issue, not a software need for update or anything. The fact is that master volume pots are either low quality ones, or defective manufacturing components. So, all I need to know are the specs of this component (resistance values, taper, etc.) so I can purchase the correct component and replace it myself. Also, understand that I live in a place where there is no authorized Marshall servicing, and my Code amp is over three years old, therefore without any warranty. Again, please no more "send equipment to an engineer" answers, I have enough ability to do the work myself. A good thing would be if you make available the schematic diagrams of the Code amps, but I think that might be not possible. or you would have done it a long time ago.
Thank you in advance for your attention! Marshall Code RULES! But without that scratchy pot...
Best Regards,

Yes, Gustavo, I confirm that master volume pot is the worst component of CODE series amplifiers. When I set gain and volume pots to get desired signal level on USB recording output, there is no way to set master volume low enough to play in my room.
As my skills in electonics are also sufficient to replace this pot myself I'm also very interested to obtain the scheme of - at least - analog part of the amp, to be able to modify the signal path according to my needs.


PASST AUF ! ! ! ACHTUNG .
------------------------
Das Netzteil ist an das Stromnetz angeschlossen, daher stehen viele Teile unter Spannung, die direkt an das Stromnetz angeschlossen werden können
Am sichersten ist es, einen Trenntransformator zu verwenden, besonders wenn Sie es sind
ein Oszilloskop misst den Primärteil der Stromversorgung, da die Masse des Oszilloskops geerdet ist.
Ohne Trenntransformator machen Sie eine Schließung und dies kann zu großen Schäden am Schalter oder anderem führen
Teile in der Stromversorgung, der Sicherung oder dem Oszilloskop.
Ich nehme an, Sie kennen sich mit Elektronik aus. Wenn dies nicht der Fall ist, empfehle ich Sie
einen Reparateur zu finden, der ist Sie müssen im Besitz von Messgeräten sein, um Fehler zu vermeiden
zu lokalisieren. Bringen Sie die Schaltpläne und die Beschreibung zu Ihrem Reparateur, es wird ihm sehr helfen
Sie können diese Zeitpläne auch über das Internet an diejenigen verteilen, die davon profitieren.
Reparaturbeschreibung MARSHALL CODE 25 UND CODE 50.
Die Netzteile sind für Netzspannungen zwischen 100 und 250 V AC./50 oder 60 Hz geeignet.
1. Schließen Sie das Netzteil mit einer 230-V-, 100-W-Glühlampe in Reihe an das Stromnetz an.
Dies schützt verschiedene Teile im Falle eines Kurzschlusses in der Stromversorgung.
Im geschlossenen Zustand leuchtet die Lampe auf und der Strom wird begrenzt, Sie können dies auch
Messen Sie normalerweise noch einige Spannungen oder mit vollständiger Schließung eines Teils
nichts. Auf diese Weise wird Ihnen auf Ihrem Weg zu dem , was falsch ist , geholfen .
Diese Schaltung kann natürlich mit jedem Netzteil oder Verstärker verwendet werden.
Wenn die Lampe blinkt, zeigt dies an, dass die Stromversorgung "Schluckauf" hat, was normalerweise darauf hinweist
an einem Befestigungselement im Sekundärteil des Netzteils.
2. Trennen Sie die Kabel vom Netzteil zum Verstärker . gelbes und weißes Kabel,
das ist die Spannung U1. Das Netzteil muss für eine ordnungsgemäße Steuerung geladen sein.
DUMMY-WIDERSTAND.
CODE 25.
Für ein Netzteil des CODE 25 nehmen Sie 3 Widerstände von 47 R 10 W, schalten Sie sie parallel.
Das ergibt einen Widerstand von 15,6 R, die Versorgungsspannung des CODE 25 U1 beträgt ca. 16 V.
CODE50.
Beim CODE 50 nimmt man hier für 3 Widerstände 68 R 10 W, diese legt man auch parallel zueinander.
Jetzt beträgt der Widerstand 22,6 R , U1 des CODE 50 liegt bei etwa 21 V.
3. Ich habe bei den Netzteilen mehrfach festgestellt, dass der OPTO 1 (Doppel-Optokoppler) defekt war.
Wenn Sie beim Einschalten des Netzschalters ein lautes "Klacken"/"Knallen" im Lautsprecher hören, ist es fast
immer kaputt. Es ist auch möglich, dass sich dieser Fehler durch Drehen des Lautstärkepotentiometers im Ton bemerkbar macht
fällt weg kommt nach ein paar sekunden wieder und kann dann sehr verformt sein, lässt sich nicht richtig einstellen.
PASST AUF !
Trennen Sie in diesem Fall IMMER die Kabel des Netzteils vom Verstärker und platzieren Sie den Dummy.
Die U1-Spannung kann dann viel zu hoch ansteigen und die Endstufe und andere Schaltkreise beschädigen.
Mir ist auch schon oft aufgefallen, dass nach dem Fehler mit dem Optokoppler die PRESET-Einstellungen der verschiedenen Tone
Art gestört wurde und dass es zu laut war und den Ton stark verzerrt wiedergab.
Also alles neu aufgebaut.
4. Teile, die ich oft ersetzt habe:
OPTO 1 = mct 6 Dual-Optokoppler
DZ 1 = 18 sc Zener
DZ 3 = 12 V Zener
C13 (Code 25)
C 15 ( Code 50 )
C 16 = 220 uF 25 V (Code 25)
C16 = 330 uF 35 V (Code 50)
Q1 = spp08n80c
D8 = mcc s2150 Schottky-Gleichrichter
D7a = dss6-150 als Schottky-Gleichrichter
D1 = mcc sk810 Schottky-Gleichrichter
Es ist nicht erforderlich, diese Teile vorsorglich auszutauschen.

Thats all I have. Could be the power supply. Not what you need.


Possibly this helps: Refer to YouTube and search for: "Marshall Code 100H - Repair ( Scratchy Pot & Busting Sounds )"
If not buy a cheap used Code 25 and use it's parts for the 100h.


Hi Jacek, thanks for the comments!
I don't undestand why Marshall doesn't make the schematic diagrams of the code amps available. I have seen several requests in this forum, but absolutely no position from Marshall support. And yep, as you confirmed, these master volume pots are in fact the most critical parts of the equipament, something that Marshall could very well get around perhaps with a recall, or even make the schematic diagrams available along with a technical note. I also don't think it's fair to have the board replaced just because of a seemingly easy-to-solve issue. In my case, where we don't have Marshall authorized servicing, I would have to import the part and pay taxes, fees and shipping, which would become unfeasible because these expenses would almost reach the price of a brand new amp.
Regards,


Hi Alex,
First of all, thank you very much for the schematics and instructions. Any info is always welcome, and although in fact it's not what I'm looking for now, I will keep this documentation with affection, because I believe that at some point it may be useful to me or another Code owner. I agree with that you said before. This thread (and the no replies) is a typical example that there's no commitment from people at Marshall in providing help so we can solve a problem ourselves. The most they suggest is to send the equipment to an authorized servicing, but that isn't always possible as in my case for example. That attitude can indeed lead the consumer to act in the most obvious way possible, that is, not to buy the goods from the same brand anymore. Marshall probably already had this in mind and they don't care, maybe because they favor their most expensive line of equipments (valve amps), so for them there is no interest in focusing on a technology that they have no interest in maintaining anymore. An example may have been the deactivation of the100 watts line of Code amps, and the lack of frequent updates to the Gateway app and the amps' firmware.
Anyway I'll keep insisting on this forum, first because I love my Code 100h, and even that Marshall doesn't take a position on the matter, I wish one time or another someone will contribute with some useful info as yourself have done here, and for wich I am most grateful.
Best Regards,


Thank you again, Alex.
I already watched that video a couple of times, that's a good guide but actually the guy doesn't swap the pot, he just clean it and resolder the points. No info about the resistance values anyway. Even if it seems effective in a first moment, it's not the type of permanent, corrective maintenance since the scratchy ends up coming back in a short time, the issue is not just dirt, but also the component itself. The process of taking apart the equipment and disconnect-reconnect all those fragile flat cables is a risk if it has to be done on a regular basis every time the pot starts to scratch. Having a "donor" Code to take out parts it's not a possibility since used Code 25 amps are also a bit expensive here in my country to the point of becoming unfeasible the option.
Best Regards,


www.etronic-parts.com/Verstaerker-PC-board/Marshall-CODE-50-100-frontpanel::1842.html

Thanks for the link, Alex.
I'd still prefer to trade the pot myself for one of the correct value, but changing the board would be a good idea too, even though for me it remains something extreme and unecessary. Nothing guarantees that the new board hadn't the same faulty component. The issue is not the board itself, but a simple (low quality) component soldered to it, instead. I'm an old school guy, I still believe that things can be fixed, not unecessarily replaced :)
Regards,

I'm pretty sure if you remove the pot the value will be written on it. If it somehow isn't you could just measure the resistance between the 2 outer lugs and this will give you the value of the pot. As it's an audio volume control it will be a Log tapered pot. Pots come in preferred values so as an example, if you for instance measure around 462K ohms, it will be a 470K Log pot, bearing in mind there are tolerances to these components so even a brand new high quality components probably wont exactly measure as the value printed on it.

